Hiển thị các bài đăng có nhãn Gifts. Hiển thị tất cả bài đăng

Chủ Nhật, 3 tháng 4, 2011

Candy Bouquets JEWELLERY bow tutorial


BASIS OF BOUQUET.

Pre-need to decide how many "colors" of flowers and additional material nadopodgotovit for the manufacture and installation of a bouquet to the selected container.

Thứ Sáu, 1 tháng 4, 2011

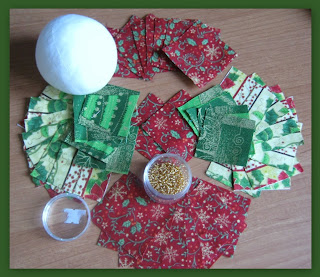
Textile ball for Christmas


 cut eight squares 5x5 for the central motif and 16 boxes to a beacon.Balls I got a diameter of 7.5 cm, the size of the squares determined empirically. Yes still need 2 squares for the substrate under the central motif.

Thứ Tư, 30 tháng 3, 2011

Chủ Nhật, 27 tháng 3, 2011

Crafty jewelry:

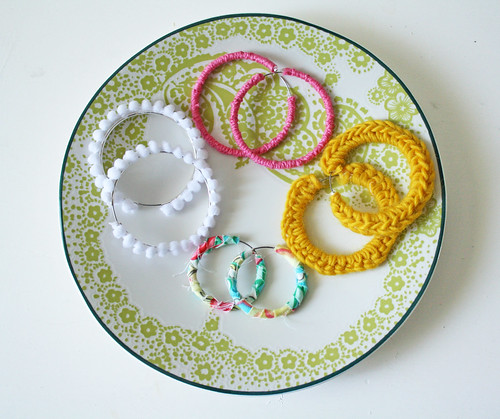
Accessories: knotted, trimmed, crocheted & wrapped earrings from happy together

Fabric Wrapped Earrings


Lots of Hoops
Well, did you know that you can totally customize them for yourself?
A Plate Full of Beautifuls
It’s so much better to have things that make you stand out in a good way because no one else has them.
Stacked Up
You get to put your own personality into it. Your favorite colors. Your favorite yarn. And the list goes on and on.
All Together Now

Thứ Năm, 24 tháng 3, 2011

A Spring Bouquet; Ribbon Flowers - Two Ways

https://blogger.googleusercontent.com/img/b/R29vZ2xl/AVvXsEgd0-87PfxTn5MDgS4TuI6RLfsQL6CBgD1F8bD83dV1pCD4-kahbPK8wXNVIgIhjGWkdhLgbct0ZwOIdiA4L5ZDHU6cOM0b7QP9IcQOya01BGwiusAkPubPfHj8uP6DLneTwujoHsbTqL4X/s400/DSCN2892.JPG
Is spring taking it's own sweet time in your neck of the woods? Well, it is here. I crave color and life; I want to see green grass and flowers! On this sunny 27 degree day in Pittsburgh, I have to settle for some crafty flowers instead. Do you have any ribbon or buttons lying around? Okay, let's get to work.

Supplies:

Ribbon
Buttons
Floral wire
Floral tape
Needle
Thread
Scissors
Glue gun

How-To: Make Your Love Bloom Forever

http://www.etsy.com/storque/media/articles/2009/02/3379-burdaIMG_4669_565px_etsy.jpg


Learn how to make beautiful and simple ribbon or fabric flowers! Make a bunch and have lovely flowers that bloom on and on!  As always, all projects and patterns on the site are copyright free, so you can sell what you make from them. This is a perfect project for Valentine's Day or a wedding in need of some handmade touches.

Thứ Ba, 8 tháng 2, 2011

Fabric Boutonnieres tutorial


Hi, all!  I’m Chelsea. I have a little blog called Lovely Indeed where I document all of the crazy DIY projects I’ve been doing to prepare for my wedding (along with some other lovely things thrown in for good measure). When Cyd recently asked me to stop by The Sweetest Occasion every once in a while and share some DIY love, I just about fell out of my chair. I’m an avid fan and reader, and I’ve gotta say – I’m super honored to be here. Now on with the show!
Get out your glue guns, kids – these ain’t your mama’s boutonnieres. Today I thought I’d share a little DIY project that I’m actually using in my own wedding!  When my fiance (we’ll call him Mr. Lovely) and I decided to do fabric boutonnieres, I was a little intimidated. I did some research and found about a zillion different styles, but none that felt quite right. So I came up with this design – clean, sweet, and above all:  simple.  Let’s do this.
Here’s what you’ll need.

walnut boat DIY


One of our favorite things from Meredith’s Play Outside party was definitely the walnut boats.  So we’re thrilled that Meredith is sharing with us how easy and fun they were to make.

Supplies:
  • Halved and cleaned walnut shells
  • Wooden toothpicks
  • A white candle
  • Scissors
  • Decorative tape, such as Japanese Washi Tape

1.       Light candle and drip wax about ¼ of the way up the inside of each empty walnut shell.

Tutorials: Wonderful Washi Tape

 
Washi Tape, omiyage, washi tape tutorial
by Marisa Edghill of Omiyage
At the beginning of a new year, I always like to take a look back at the things which brought a little joy to my life in an effort to make each year more joyful than the last.  And, often, these are simple pleasures – a cup of tea and a good book, fresh snow, snail mail, the smell of bread baking. In 2010, one of those simple pleasures for me was washi tape.
.
a group of artists approached a Japanese masking tape manufacturer – Kamoi Kakoshi – and presented them with a book of art they had created using the company’s industrial masking tapes.  They came to the company with a request, that Kamoi Kakoshi manufacture masking tapes in a variety of colours for use by artists.  Intrigued by what could be, Kamoi created mt masking tape – washi tape in 20 colours designed to bring out the beauty of the rice paper or washi.  That is, I think, what sets Japanese masking tapes apart from their Western versions – the use of rice paper, which allows the tape to be delicate yet strong and gives it an unmatched translucent quality. Anyway, back to our story, these colourful masking tapes were a hit – with artists, crafters, and design aficionados alike.  Heartened by the success, new colours and patterns – traditional, playful, modern – were released and embraced by the international community.  Washi tape was a hit!

Singed Flower and Kneehigh Headband TUTORIAL


Here's how I made my Singed Flower headband from last week. Several of you said you'd made tons of these, and I've only done a handful, so if you have a better way, helpful tips, or want to add something, let me know and I'll add it in.
Supplies:
  • organza fabric made of 100% nylon, rayon, or polyester (you don't need much, scraps will do)
  • lighter
  • scissors
  • small piece of felt
  • pins
  • low heat glue gun
  • brad for flower center
  • knee highs, nylons, or tights (feel free to use that pair of nylons that snagged when you opened them!)
  • about 3" of coordinating ribbon

Thứ Hai, 31 tháng 1, 2011

How to make Candy Cane Hearts

I see these candy cane hearts all over the web and in stores. Left with some extra candy canes after Christmas I thought I would give it a try!

All you need are candy canes (I used mini ones) and lollipop sticks.

Chủ Nhật, 26 tháng 12, 2010

Pom pom maker


pompomtut1
This is a tutorial for making pom-poms using your
fingers. This one is a small, two-finger pom-pom
(about 1" in diameter) but you can make bigger ones
by using more fingers. As far as yarn choice, thinner
and softer yarn will make a more pleasing pom-pom.