Hiển thị các bài đăng có nhãn Tutorial. Hiển thị tất cả bài đăng

Thứ Hai, 23 tháng 5, 2011

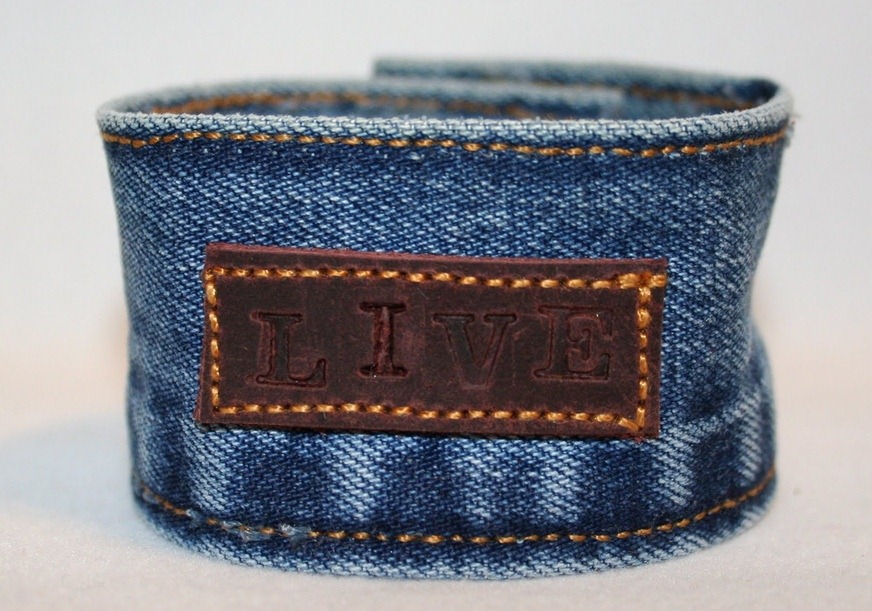
Sew a denim strap tutorial


Universal ornament for the dress code “military” and “casual” is a denim strap. It combines easily with both denim clothing and white cotton and natural linen. And how to sew his jeans bracelet from the remnants we now describe.
tayra-2010-08-31_091336
For starters just take a small segment of brown leather and padded emboss letters every sign (though this requires special metal printed letters). If you do not, then just cut out the leather segment 5 * 2 cm

Carving swan and lotus with eggs and onion tutorial

Carving fruits tutorial 

The box is made of beads tutorial

What do you get

Immediately warn you that for a really good master class I do not have pictures. Missing tried to draw. I hope it will more or less clear.
Let's begin.
1) You will need 4 rings, 3 for most boxes, and 1 for the cover. (Rings, in principle, can be made from wire, but would be willing to ponadezhnee). I have a diameter of about 7 cm

Thứ Năm, 5 tháng 5, 2011

Deep frame of the box tutorial


 Someone can not stand in the house remains, scraps, boxes. Someone can easily find them for domestic use. And not only so, but with a twist.


Materials:

Tight shoe box.
Caulking
PVA glue
Latex paint.
Tinting formulations for paint
Wide molding
Serebryanka powder.
Glue for ceiling tiles or all-purpose adhesive
Board
Tools:
Prototype knife, wood stapler, putty miter box.

Thứ Tư, 4 tháng 5, 2011

Strawberries booties tutorial

Girls, for sure many of you already knit booties zefirki famous, and I have based on them appeared an interesting idea, that's what it turned out! 


Crochet cast on


This cast on is done with yarn, a knitting needle and a crochet hook. It serves one of two purposes.
First, it can be used as a 'provisional' or temporary cast on. You would work the cast on with waste yarn, preferably a smooth cotton, and you would cut the waste yarn after casting on. You would now work the body of the garment up from this cast on. When done, pick out the last loop formed in the crochet process. Rip the rest of the crochet cast on off in one simple motion. You will be presented with are loops or open stitches along the bottom of the garment body piece from which you would work your edging down.
Second, it is also known – in Montse Stanley's knitting techniques book – as the 'bind off cast on' because it is the only cast on which looks like a bind off row. That makes it a perfect choice for garments which may be designed without edgings, like scarves, shawls, afghans. Begin with this cast on, work slip stitches up the sides, an end with the bind off, and now all four edges would look identical. I also use it for garments – like garter stitch vests – with no edgings.
It is not an appropriate cast on for ribbed edges because it is too loose.
You need one knitting needle the size you will use for the garment body knitting.
You need a crochet hook about the same size. If doing a provisional cast on, you need waste yarn about three times the width of the garment body piece. If using this cast on as the beginning to a piece of knitting, use the required yarn. Directions that follow are for right handed knitters.
  1. Make a slip knot in your yarn.
  2. Put it onto the crochet hook and hold in right hand.
  3. Hold the knitting needle in the left hand.
  4. Carry the yarn under the knitting needle and wrap around left index finger, as if to knit continental or as if to crochet.
  5. With left middle finger and thumb, hold tail of slip knot and knitting needle tight together.
  6. Take crochet hook OVER TOP of knitting needle and draw through a loop.

Learn to knit

Cast on

I am often asked this question, and the answer is that I don't have a single preference. That said, the methods I prefer do not include the 'long-tail'.
Which methods do I prefer?
The first method I ever learned was the'knitted cast-on'. This begins with a slip knot onto the left-hand-needle. Knit into the slip knot, just as though it were a stitch, except that the loop that is formed is placed back onto the left-hand-needle. One stitch is now cast-on. Continue in this way, knitting into the leading stitch and putting the loop formed back onto the left-hand-needle, until you have the number of stitches needed. To learn a trick to make the beginning edge of the cast-on row neater, read on.


Knitted cast-on is a nice and neat cast-on, but when I want a tighter cast-on, I use the 'cable cast-on'. This method also begins with a slip knot onto the left-hand-needle. Next, knit into the slip knot - in the usual fashion - but put the loop formed back onto the left-hand-needle. So far, it is just like the 'knitted cast-on'. Here's the difference: to proceed, stick the right-hand-needle between the two leading stitches on the left-hand-needle, rather than into the leading stitch on the left-hand-needle. Draw through a loop to be put back onto the left-hand-needle. This forms a tighter cast-on and it is the only cast-on, in my opinion, appropriate for buttonholes. I also use it at the beginnings of most garments, with the exceptions listed below.
When using these methods, a common question is 'Do I twist the loop before putting it onto the left-hand-needle?' The answer is that it doesn't matter as long as you are consistent.


The Gates Project Scarf tutorial


The Gates Project Scarf

Central Park - New York, NY

MATERIALS
1 skein Red Heart - 242 Pumpkin (or any bright orange yarn)
Size 7 straight needles
Size 7 double pointed needles
2 small stitch holders
PATTERNS
I-Cord - see this photographic step-by-step tutorial on how to make an I-cord. I only used 2 stitches for each I-cord.
Swatches - K2 P2 ribbing 20 stitches by 12 rows
PREPARATION
Separate about 20 yards of the orange yarn and roll it into a ball. You will use this for the right side I-cord and will carry the yarn along each row to eliminate unecessary weaving of ends.

Bearista Dress tutorial

Bearista Dress

Westport, CT

MATERIALS
1 skein Red Heart Grande yarn
1 set US Size 15 straight needles
1 large crochet hook to weave in loose ends and make straps
Incr = increase one by knitting into the front and the back of the stitch
DIRECTIONS
Cast on 24 stitches (Bearista Bear has a 12 inch circumference)
ROW 1: Knit across

Chủ Nhật, 3 tháng 4, 2011

Candy Bouquets JEWELLERY bow tutorial


BASIS OF BOUQUET.

Pre-need to decide how many "colors" of flowers and additional material nadopodgotovit for the manufacture and installation of a bouquet to the selected container.

Thứ Sáu, 1 tháng 4, 2011

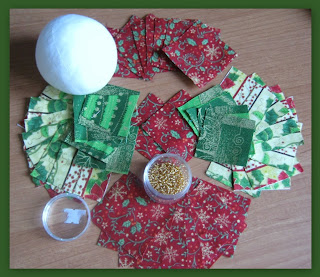
Textile ball for Christmas


 cut eight squares 5x5 for the central motif and 16 boxes to a beacon.Balls I got a diameter of 7.5 cm, the size of the squares determined empirically. Yes still need 2 squares for the substrate under the central motif.

Thứ Năm, 31 tháng 3, 2011

Chủ Nhật, 27 tháng 3, 2011

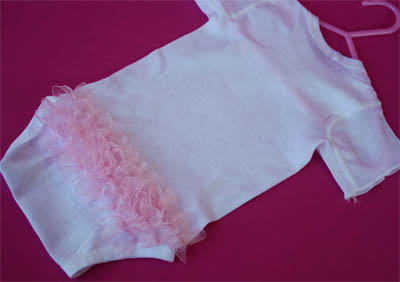
Tutorial: Easy Ruffle Bottom Onesie


For this ruffled butt onesie no need to cut strips of fabric and finish edges. I used 1 1/2 inch wide organza ribbon. So grab a onesie (a nicer quality one than I had on hand)  and some ribbon and you are ready to go.

Crafty jewelry:

Accessories: knotted, trimmed, crocheted & wrapped earrings from happy together

Fabric Wrapped Earrings


Lots of Hoops
Well, did you know that you can totally customize them for yourself?
A Plate Full of Beautifuls
It’s so much better to have things that make you stand out in a good way because no one else has them.
Stacked Up
You get to put your own personality into it. Your favorite colors. Your favorite yarn. And the list goes on and on.
All Together Now

Tutorial making a hanger space-saver

Need a little more room in your closet? Try one of these hanger space savers. This ribbon space saver allows you to get a few more items in your closet without taking up more rack or bar space.

Thứ Năm, 24 tháng 3, 2011

Bunting Inspired Ribbon Buttons


I love the 4th of July and this time of year I start thinking of all things red, white and blue.
The look of a classic bunting is on my mind.  So this morning I pulled out some of my supplies of ribbon and fabrics and started to play around.

Tutorial Stocking Stuffer: Scrubby Buddies

Scrubby Buddy sewing tutorial

Yesterday as I was putting laundry away, I was admiring how well this little guy has held up to countless washings! Then I thought what a wonderful stocking stuffer these little scrubby buddies would make for any little one on your list!