Hiển thị các bài đăng có nhãn Toys. Hiển thị tất cả bài đăng

Thứ Hai, 23 tháng 5, 2011

The box is made of beads tutorial

What do you get

Immediately warn you that for a really good master class I do not have pictures. Missing tried to draw. I hope it will more or less clear.
Let's begin.
1) You will need 4 rings, 3 for most boxes, and 1 for the cover. (Rings, in principle, can be made from wire, but would be willing to ponadezhnee). I have a diameter of about 7 cm

Thứ Sáu, 1 tháng 4, 2011

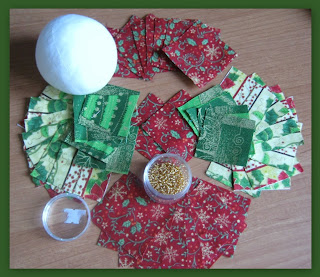
Textile ball for Christmas


 cut eight squares 5x5 for the central motif and 16 boxes to a beacon.Balls I got a diameter of 7.5 cm, the size of the squares determined empirically. Yes still need 2 squares for the substrate under the central motif.

Chủ Nhật, 27 tháng 3, 2011

make Baby Pram

Isn't it darling?

Tutorial making a hanger space-saver

Need a little more room in your closet? Try one of these hanger space savers. This ribbon space saver allows you to get a few more items in your closet without taking up more rack or bar space.

Thứ Năm, 24 tháng 3, 2011

Tutorial Stocking Stuffer: Scrubby Buddies

Scrubby Buddy sewing tutorial

Yesterday as I was putting laundry away, I was admiring how well this little guy has held up to countless washings! Then I thought what a wonderful stocking stuffer these little scrubby buddies would make for any little one on your list!

Thứ Hai, 14 tháng 2, 2011

Decorating the $1.25 Christmas Tree

Most of you who read my other blog, know I scored a little four and a half foot tree at the Salvation Army Store for $1.25! Being in the process of transitioning from Colorado's Front Range to the Pacific Northwest, all of our belongings are stored, so we had to pretty much start from scratch with this year's tree.


The little Salvation Army tree had definitely seen some better days, and was looking a little sad. Back in my event planning days, scraggly trees were "filled in" with cuttings from other evergreens, so I decided to grab some evergreen garland while still in the store.

Thứ Ba, 8 tháng 2, 2011

walnut boat DIY


One of our favorite things from Meredith’s Play Outside party was definitely the walnut boats.  So we’re thrilled that Meredith is sharing with us how easy and fun they were to make.

Supplies:
  • Halved and cleaned walnut shells
  • Wooden toothpicks
  • A white candle
  • Scissors
  • Decorative tape, such as Japanese Washi Tape

1.       Light candle and drip wax about ¼ of the way up the inside of each empty walnut shell.

Tutorials: Wonderful Washi Tape

 
Washi Tape, omiyage, washi tape tutorial
by Marisa Edghill of Omiyage
At the beginning of a new year, I always like to take a look back at the things which brought a little joy to my life in an effort to make each year more joyful than the last.  And, often, these are simple pleasures – a cup of tea and a good book, fresh snow, snail mail, the smell of bread baking. In 2010, one of those simple pleasures for me was washi tape.
.
a group of artists approached a Japanese masking tape manufacturer – Kamoi Kakoshi – and presented them with a book of art they had created using the company’s industrial masking tapes.  They came to the company with a request, that Kamoi Kakoshi manufacture masking tapes in a variety of colours for use by artists.  Intrigued by what could be, Kamoi created mt masking tape – washi tape in 20 colours designed to bring out the beauty of the rice paper or washi That is, I think, what sets Japanese masking tapes apart from their Western versions – the use of rice paper, which allows the tape to be delicate yet strong and gives it an unmatched translucent quality. Anyway, back to our story, these colourful masking tapes were a hit – with artists, crafters, and design aficionados alike.  Heartened by the success, new colours and patterns – traditional, playful, modern – were released and embraced by the international community.  Washi tape was a hit!

Thứ Hai, 31 tháng 1, 2011

Summer Kid Crafts: Weaving without a Loom

I saw this idea for weaving a sunflower and bookmarked it for future use as it's a definite A+. This simple, summer craft is inexpensive and time consuming enough to keep little hands busy for hours of happiness.

Using a sturdy paper plate cut approximately 25 teeth around the edge. It’s better to have it be an odd number of teeth for the weaving process.

Tape the end of a piece of yarn on the backside of the plate and bring it up over the top, between two of the teeth, so that the yarn rests in one of the grooves. Cross over the middle of the plate to the other side and the opposite groove. Wrap the yarn around and around the plate, groove by groove until all the slots are filled with a string then tape the loose end on the back of the plate for security.


Weaving without a Loom


Using a tapestry needle, begin in the center and weave in and out, around and around the plate as wide and beautiful as you'd like until you have a pretty sunflower. Add new colors as you'd like, use fluffy yarn or sequined string for special effects, you just can't go wrong and it's a great way to encourage small motor skills with young children (just make sure that needle isn't sharp).
Weaving without a Loom

Foam Puppets


Cheyanne loves making puppets. So we made these easy foam stick puppets.I think they would make for a great puppet show.

Chủ Nhật, 26 tháng 12, 2010

Pom pom maker


pompomtut1
This is a tutorial for making pom-poms using your
fingers. This one is a small, two-finger pom-pom
(about 1" in diameter) but you can make bigger ones
by using more fingers. As far as yarn choice, thinner
and softer yarn will make a more pleasing pom-pom.